WordPress Localhost, the leading content management system for diverse website launches, doubles as an invaluable tool for web testing. Opting for a local WordPress installation over a web hosting plan holds various advantages.
This guide elaborates on the straightforward process of setting up WordPress locally in six steps. Leveraging the XAMPP software for localhost, known for its versatility across multiple operating systems, we’ll delve into how WordPress localhost functions and the myriad benefits it offers
Why install WordPress on Localhost
When installing WordPress CMS locally, the entire website is placed in the localhost environment.
The website establishes a connection to the local machine using a loopback address network rather than over the Internet, hence the term “local”.
Localhost WordPress site allows developers and web designers to test features before implementing them on a live site. Thanks to that, you can fix any errors immediately without affecting the user experience.
Users who want to learn web development can also benefit from this version of WordPress. You can create a copy of the website directly on your computer and experience it without having to buy a hosting plan or domain name.
Installing WordPress Locally: A 6-Step Process
There are many different local server software options for creating a local WordPress site.
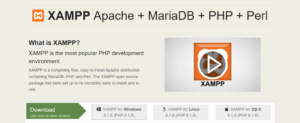
In this step-by-step guide, we will use XAMPP, the most popular cross-platform web server for PHP development.
1. Download XAMPP
Visit the official Apache Friends website and download the correct XAMPP software version according to your operating system.
2. Install and run XAMPP on your computer
Run the XAMPP installer and follow the installation instructions using the default settings.
If you see a pop-up stating that your antivirus software may interfere with the installation, click Yes to continue.

After installing XAMPP, run the application and configure the environment. In the XAMPP control panel, start the Apache and MySQL modules for the localhost WordPress installation.
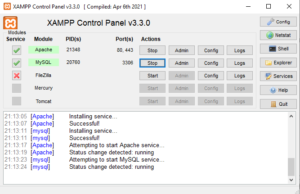
If you are using the Windows operating system, you may encounter a local server connection refused error. Temporarily disabling your firewall or stopping programs using port 80 should resolve this issue.
3. Download WordPress
Once the server is up and running, the next step is to install WordPress. Download the latest version of WordPress, then extract the ZIP file.
Navigate to your XAMPP folder in drive C (C: \xampp) and find the htdocs folder. Upload the extracted WordPress files there. We recommend that you rename the new folder with your website name to facilitate web development on the XAMPP server.
4. Create a local database
Return to your XAMPP dashboard and select the MySQL module Admin button to launch phpMyAdmin – an administrative tool for managing MySQL and MariaDB databases . This will help you create a local MySQL database for the new website.
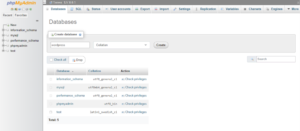
Open the Database tab and enter a database name in the Create Database section. Set the drop-down menu value to Collate and click the Create button. Your new MySQL database will appear in the left sidebar of the website.
5. Install WordPress on Localhost
Complete the local WordPress installation by visiting http: //localhost/foldername through your browser.
Don’t forget to replace the “folder name” placeholder with the folder name you selected in the third step.
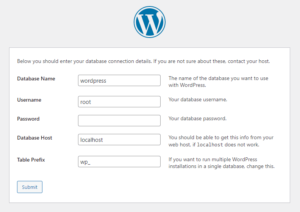
WordPress requires a list of information to create a localhost site.
Fill in the database information as follows:
• Database name ‒ the name of the database you created in phpMyAdmin.
• Username – enter “root” as the default username.
• Password – leave the MySQL database password field blank.
• Database server – keep the default “localhost”.
• Table prefix ‒ keep default “wp_”.
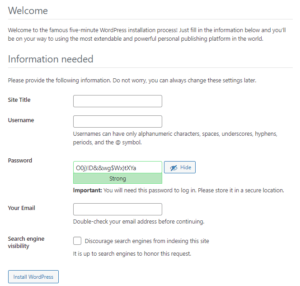
Once completed, click Submit -> Run the installation. Fill in the necessary additional information, such as your site name and login information, then click the Install WordPress button.
6. Check the Local Site You Built
That’s it – your local test site is now ready. Go to http: //localhost/foldername/wp-admin and use the login credentials you created in the previous step to access the WordPress dashboard.
Conclusion
Running a WordPress installation requires a hosting plan and a domain name.
However, if you only need it for testing or learning purposes, installing the CMS on localhost and storing all the data locally should meet your needs just fine.
Here’s a recap on how to install WordPress on a localhost environment:
1. Download XAMPP.
2. Install XAMPP on your computer.
3. Download the latest version of WordPress.
4. Create a local database in phpMyAdmin.
5. Install WordPress on localhost.
6. Visit the local testing site through your browser.