WordPress Plugins are a distinguishing feature of the powerful WordPress platform. They grant exceptional extensibility, allowing you to finely adjust your website according to your precise requirements. Whether you’re a seasoned developer or a novice, this comprehensive guide will lead you through the entire process of crafting a custom WordPress plugin.
Why develop a custom WordPress plugin?
WordPress is a versatile content management system, but sometimes you need more than the basic features it offers. Custom plugins allow you to:
Meet Specific Needs: Plugins can add functionalities that are unique to your website or business.
Enhance Performance: You can optimize your site’s performance by eliminating unnecessary features and code.
Maintain Compatibility: Custom plugins ensure that your site remains compatible with WordPress updates and theme changes.
Improve Security: You have full control over your code, reducing the risk of vulnerabilities.
Prerequisites
Before diving into plugin development, make sure you have the following prerequisites in place:
WordPress Installation: You need a working WordPress website.
Text Editor or Integrated Development Environment (IDE): Choose your preferred tool for writing code.
Basic PHP Knowledge: You’ll be writing PHP code, so a fundamental understanding is necessary.
Development Environment: It is best to create a development copy of your website for testing purposes.
Step 1: Plan your plugin
Start by determining your plugin’s goals. What functionality do you want to add or change? Consider the following: –
– User Needs: What problem does your plugin solve for users?
– Features: What specific features will your plugin include?
– User Interface: How will users interact with your plugin?
– Compatibility: Make sure your plugin is compatible with different WordPress versions.
Step 2: Create a plugin folder
Navigate to the “wp-content/plugins” folder in your WordPress installation. This is where your custom plugin will reside. Create a new folder for your plugin and choose a unique, easy-to-remember name.
Step 3: Write the main plugin file
In your plugin folder, create a PHP file with the same name as the folder. This will be your plugin’s main file.
For example, if your plugin is named “CustomWidgetPlugin”, create a file named “custom-widget-plugin.php”.
Step 4: Adding the Plugin Header
Every WordPress plugin should contain a header that provides essential information. Here’s an example header for your main plugin file:
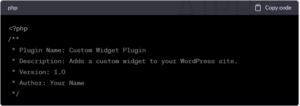
Update the values as per your plugin’s details.
Step 5: Implementing Your Plugin Functionality
Now, you can start writing the code that powers your plugin. You can use WordPress hooks, filters, and actions to integrate your functionality into the site. For example, if you’re creating a custom widget, you would use the ‘add_action()’ function to register your widget.

Don’t forget to add comments to your code for clarity and documentation.
Step 6: Test your plugin
Before deploying a plugin to your live site, it is important to test it in a controlled environment. Use a staging site or staging site to ensure your plugin works as expected and doesn’t conflict with other plugins or themes.
Step 7: Debugging and Tweaking
Chances are your plugins will have bugs or unexpected behavior from the start. Use debugging and logging tools to identify and resolve issues. Refine your code for better performance and security.
Step 8: Documentation
Include a “Readme” file that explains the installation process, features, and usage instructions. This helps users understand your plugin better.
Step 9: Deployment
If you’re confident in your custom plugin’s performance and stability, you can deploy it to your live site. Remember to back up your site before making any major changes.
Step 10: Maintenance and updates
WordPress is constantly evolving, so you need to update your plugins. Regularly check compatibility with the latest versions of WordPress and release updates if necessary.
Conclusion
Developing custom WordPress plugins can be a rewarding endeavor. It allows you to extend WordPress beyond its basic capabilities, adding exactly the features your website or business needs. By following this comprehensive guide, you’ll be well on your way to creating custom plugins that enhance your WordPress site’s functionality and user experience.
Remember, successful plugin development takes practice and patience. Start with simple plugins and gradually take on more complex projects. As you gain experience, you’ll be able to create powerful, custom solutions for your WordPress website.